Learn to set up a Node.js server using cutting-edge tools like Docker,
Nginx, and Let's Encrypt. Unlike traditional app deployment methods,
this guide walks you through the step-by-step process of deploying from
scratch. It offers a deeper understanding of how things work and gives
you full control over your setup. While it may lack some advanced production-grade
security features, this approach strikes a balance for small apps without
over-complicating security.
This setup works with cloud services such as VPS, AWS EC2, and even on physical
machines. I'll be using Ubuntu Server because it is easy to configure and has a
large, active community, making it easier to find solutions if any issues arise.
Add New Server User
Adding a new user to your server enhances security, as the default root user
should be restricted or even disabled.
adduser your_user_name
Assign User Permissions
Grant administrative privileges to the user you just created.
usermod -aG sudo your_user_name
Switch User Account
Switch to the newly created user account.
su - your_user_name
Set Up a Domain Name
Start by exploring different cloud services to compare their domain name pricing and features.
After purchasing a domain name, access its management settings to point it to your server's IP address.
To find your server's IP address, use the following command:
ip addr
In the DNS records section, add a new 'A' record and configure a subdomain for 'CNAME' entries.
Provide the IP address and set the TTL (Time to Live) to a lower value, such as 300. This allows
faster propagation, which you can adjust to a higher value later.
Check if your domain name has propagated worldwide using tools like
DNS Propagation.
Remove Password Authentication on SSH
This allows specific device to SSH without verifying your credential. So it makes SSH easier to
connect remotely.
ssh-copy-id your_user_name@111.222.33.4444
Hardening SSH
Edit these configuration files to ensure default settings are not obviously easy to gained access
by attackers.
sudo vim /etc/ssh/sshd_config
Find each fields and set the proper values.
PasswordAuthentication no
PermitRootLogin no
UsePAM no
Modify this config file if exists.
sudo vim /etc/ssh/sshd_config.d/50-cloud-init.conf
Set this field to no or just remove it.
PasswordAuthentication no
Restart the SSH daemon service to apply changes.
sudo systemctl reload ssh
Verify if user root able access remotely.
ssh root@111.222.33.444
If the output is "Permission denied(publickey)", congrats since the openssh is now hardened.
Utilized Domain Name Instead of IP Address
Double check for domain name using nslookup
nslookup your_domain_name.com
Then, now use it for ssh since IP address is forgettable
ssh your_user_name@your_domain_name.com
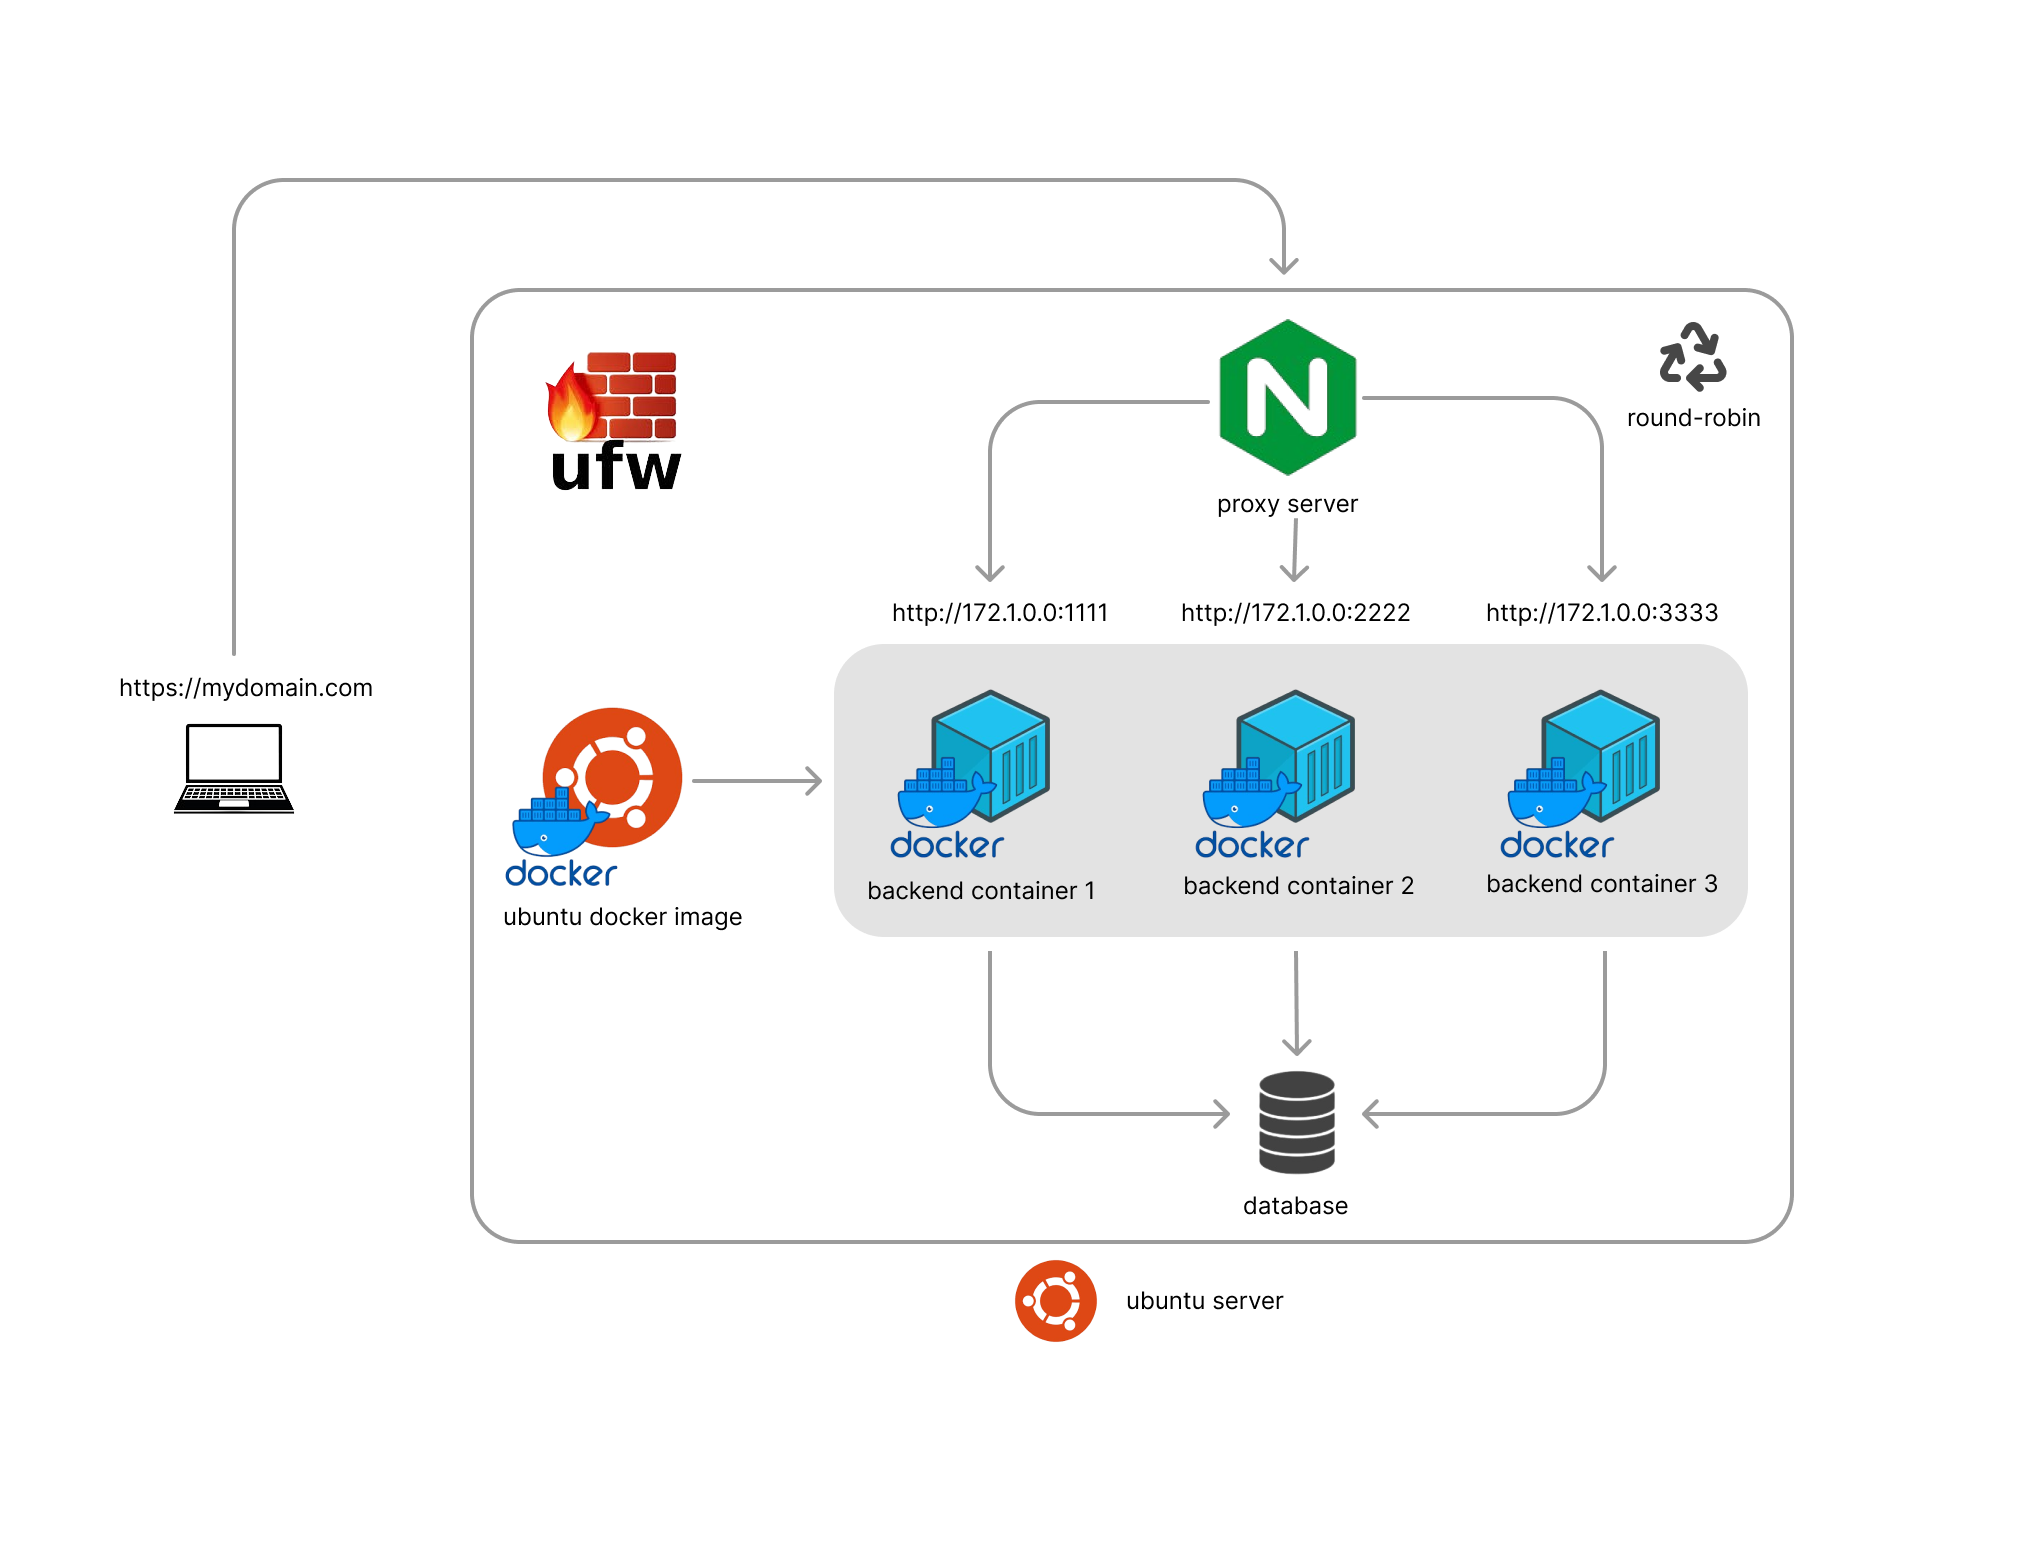
Setting Nginx as Reverse Proxy
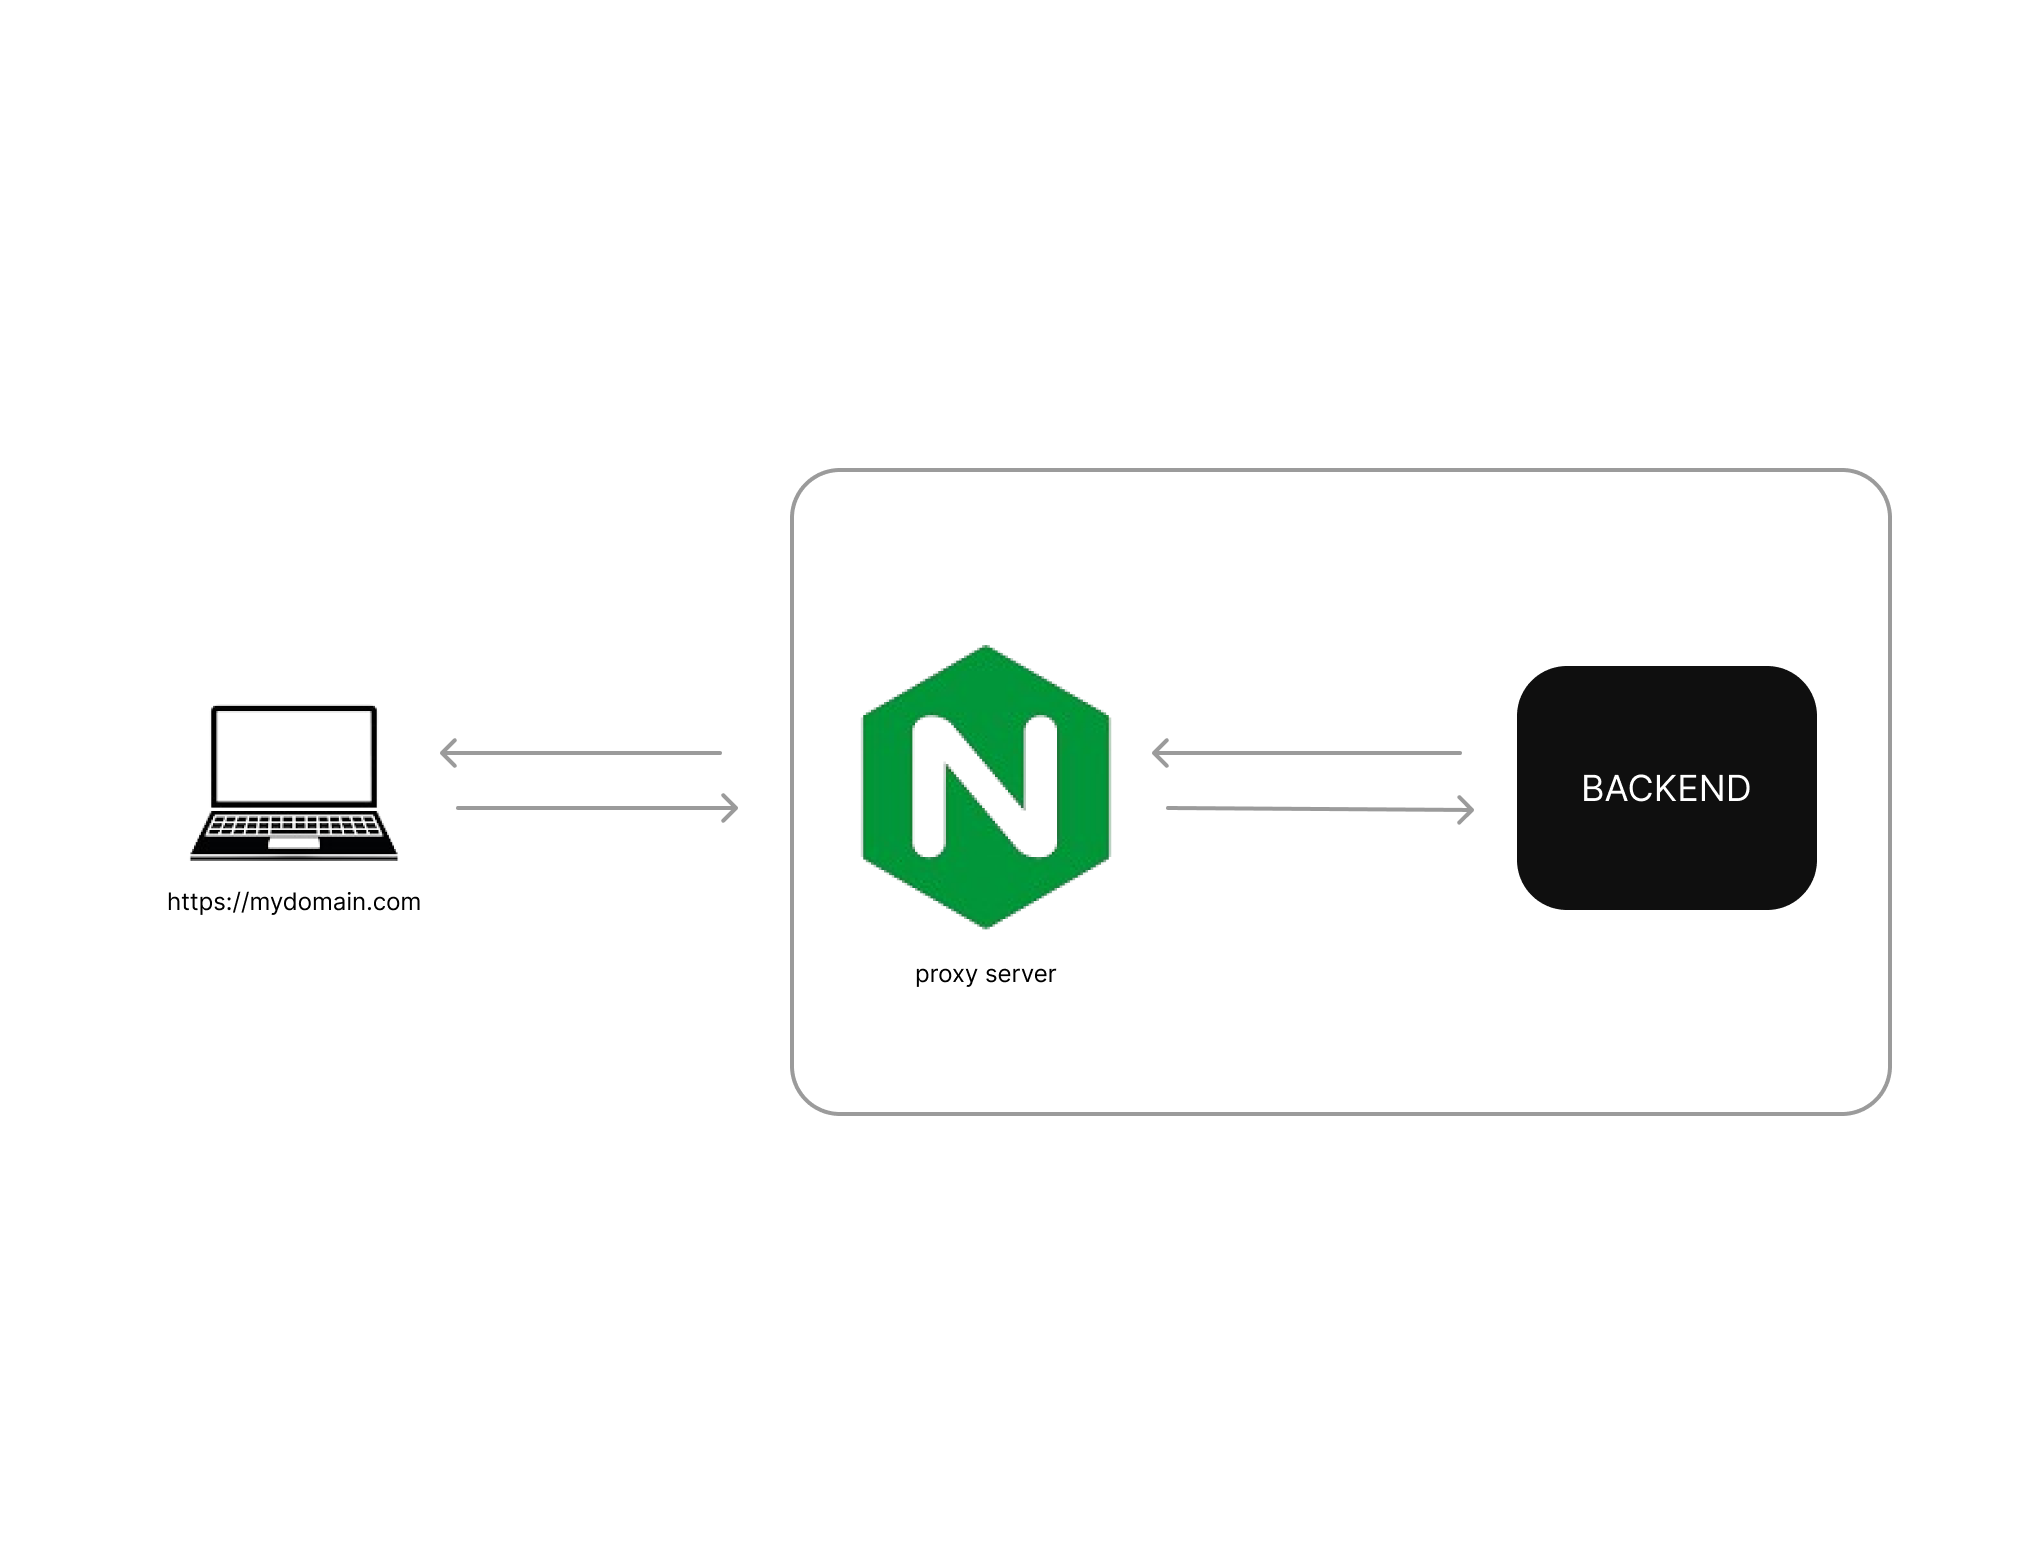 Setup Overview Diagram
In this case I will used nginx as my reverse proxy server. It doesn't automatically generates
ssl certificate for https. Typically nginx used Let's Encrypt to issue a free ssl certificate.
Steps to generate ssl with Let's Encrypt
Install necessary dependencies.
sudo apt update
sudo apt install certbot python3-certbot-nginx
Obtain ssl certificate.
sudo certbot --nginx -d your_domain_name.com
Nginx ssl configuration.
sudo vim /etc/nginx/nginx.conf
Nginx configuration file
                    user www-data;
                    worker_processes auto;
                    pid /run/nginx.pid;
                    include /etc/nginx/modules-enabled/*.conf;


                    events {
                    worker_connections 768;
                    }


                    http {
                    include /etc/nginx/mime.types;
                    default_type application/octet-stream;


                    upstream backendserver {
                    server 127.0.0.1:4001;
                    server 127.0.0.1:4002;
                    server 127.0.0.1:4003;
                    }


                    server {
                    listen 80;
                    server_name your_domain_name.com;


                    # Redirect HTTP to HTTPS
                    return 301 https://$host$request_uri;
                    }


                    server {
                    listen 443 ssl http2;
                    server_name your_domain_name.com;


                    ssl_certificate /etc/letsencrypt/live/your_domain_name.com/fullchain.pem;
                    ssl_certificate_key /etc/letsencrypt/live/your_domain_name.com/privkey.pem;
                    include /etc/letsencrypt/options-ssl-nginx.conf;
                    ssl_dhparam /etc/letsencrypt/ssl-dhparams.pem;


                    # Enforce HTTPS and secure headers
                    add_header Strict-Transport-Security "max-age=31536000; includeSubDomains; preload" always;


                    location / {
                    proxy_pass http://backendserver;
                    proxy_set_header Host $host;
                    proxy_set_header X-Real-IP $remote_addr;
                    proxy_set_header X-Forwarded-For $proxy_add_x_forwarded_for;
                    proxy_set_header X-Forwarded-Proto $scheme;
                    }
                    }
                    }
Keep in mind to replace the placeholder your_domain_name.com with your actual domain name.
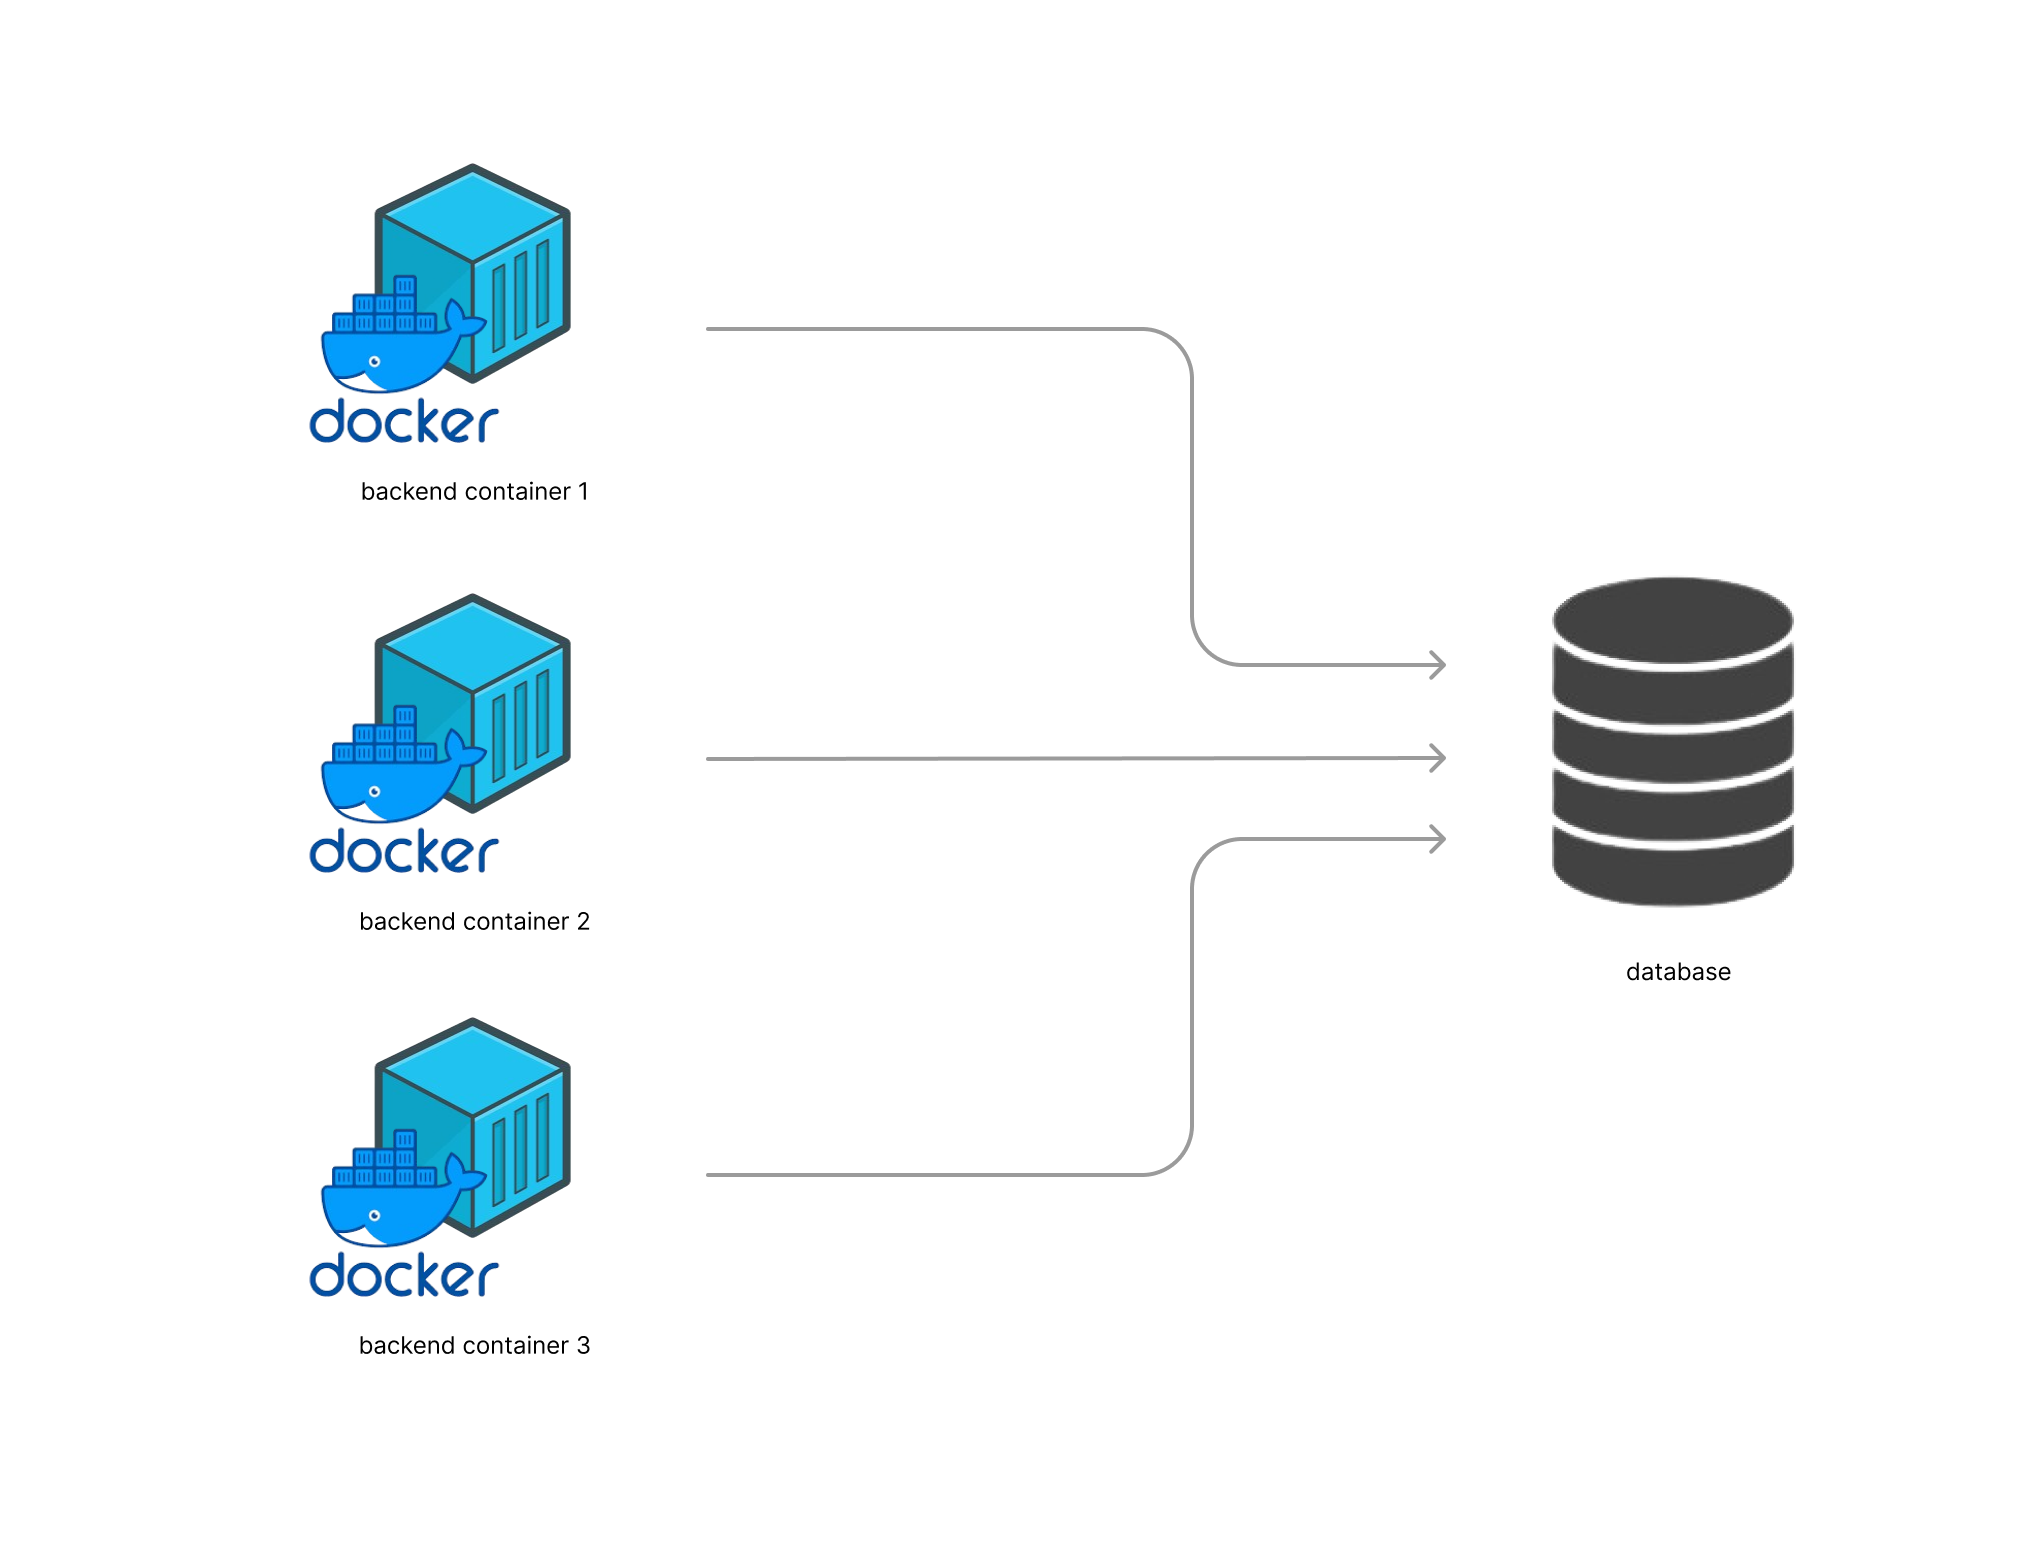
Additionally since docker will utilized for round-robin algorithm in this setup ports are essential
later for docker setup.
                    upstream backendserver {
                    server 127.0.0.1:1111;
                    server 127.0.0.1:2222;
                    server 127.0.0.1:3333;
                    }
Verify the nginx configuration syntax.
sudo nginx -t
Restart nginx.
sudo systemctl restart nginx
Setting Up Mysql Server
 Setup Overview Diagram
Install mariaDB server
sudo apt install mariadb-server -y
Start & enable mariadb
                    sudo systemctl start mariadb
                    sudo systemctl enable mariadb
                    sudo systemctl status mariadb
Clean Up Mysql
Modify mysql root user password.
                    sudo mysql -u root
                    ALTER USER 'root'@'localhost' IDENTIFIED BY 'root_password';
Display the authentication method as well as host perminssion for root user.
SELECT User, Host, plugin FROM mysql.user WHERE User='root';
Lists all anonymous user without actual username.
SELECT User, Host FROM mysql.user WHERE User='';
Clean up by deleting anonymous users(' ') associated with specific host.
                    DROP USER ''@'host';
                    DROP USER ''@'localhost';
                    DROP USER ''@'127.0.0.1';
                    DROP USER ''@'::1';
Delete unnecessary database 'test' if exist
DROP TABLE IF EXIST test;
Remove references to database named test or similar in mysql internal records.
DELETE FROM mysql.db WHERE Db = 'test' OR Db LIKE 'test\_%';
Reloads the privilege tables to ensure changes will took effect immedietely.
FLUSH PRIVILEGES;
Configuring Mysql for Docker connection
Setting new user and grant all privileges for specific database.
CREATE USER 'user_name'@'%' IDENTIFIED BY 'password';
'user_name'@'%', the percentage sign(%) allows any IP address to connect to this user.
Grant all privileges for 'user_name' on 'database_name'
                    CREATE DATABASE database_name;
                    GRANT ALL PRIVILEGES ON database_name.* TO 'user_name'@'%';
                    FLUSH PRIVILEGES;
Configuring mysql to set bind address to allow access especially for docker containers to
connect to it.
sudo vim /etc/mysql/mariadb.conf.d/50-server
Look for bind-address directive
bind-address = 0.0.0.0
Altering the value of bind-address to 0.0.0.0 makes it accesible to any request from any
IP address.
Assigning Timezone to Mysql and Ubuntu Server
Check for current timezone
timedatectl
List available timezones
timedatectl list-timezones
Set server's timezone
sudo timedatectl set-timezone Asia/Manila
Verify changes
timedatectl
Sync time with NTP(optional), ensuring the server's clock sync with NTP server.
sudo timedatectl set-ntp true
In mysql configuration replace or add timezone in /etc/mysql/mariadb.conf.d/50-server.conf
                    [mysqlId]
                    default-time-zone = '+08:00'
Save the config file and restart mysql or mariadb
sudo systemctl restart mariadb
Verify mysql timezone
                    sudo mysql -u user_name -p
                    USE database_name;
                    SELECT @@global.time_zone;
Database Creation & Codebase Inclusion
Start creating database, upload the web server code(including frontend server like React JS),
and other requirements like configuring the .env file.
Displaying available IP addresses of the server.
hostname -I
Take note the IP address of mysql server which start with '172.0.0.0'.
Configuring .env file with database credentials
                    PORT='4000'
                    DB_HOST='172.0.0.0'
                    DB_USER='user_name'
                    DB_PASSWORD='password'
                    DB_NAME='database_name'
Setting Up Docker
 Setup Overview Diagram
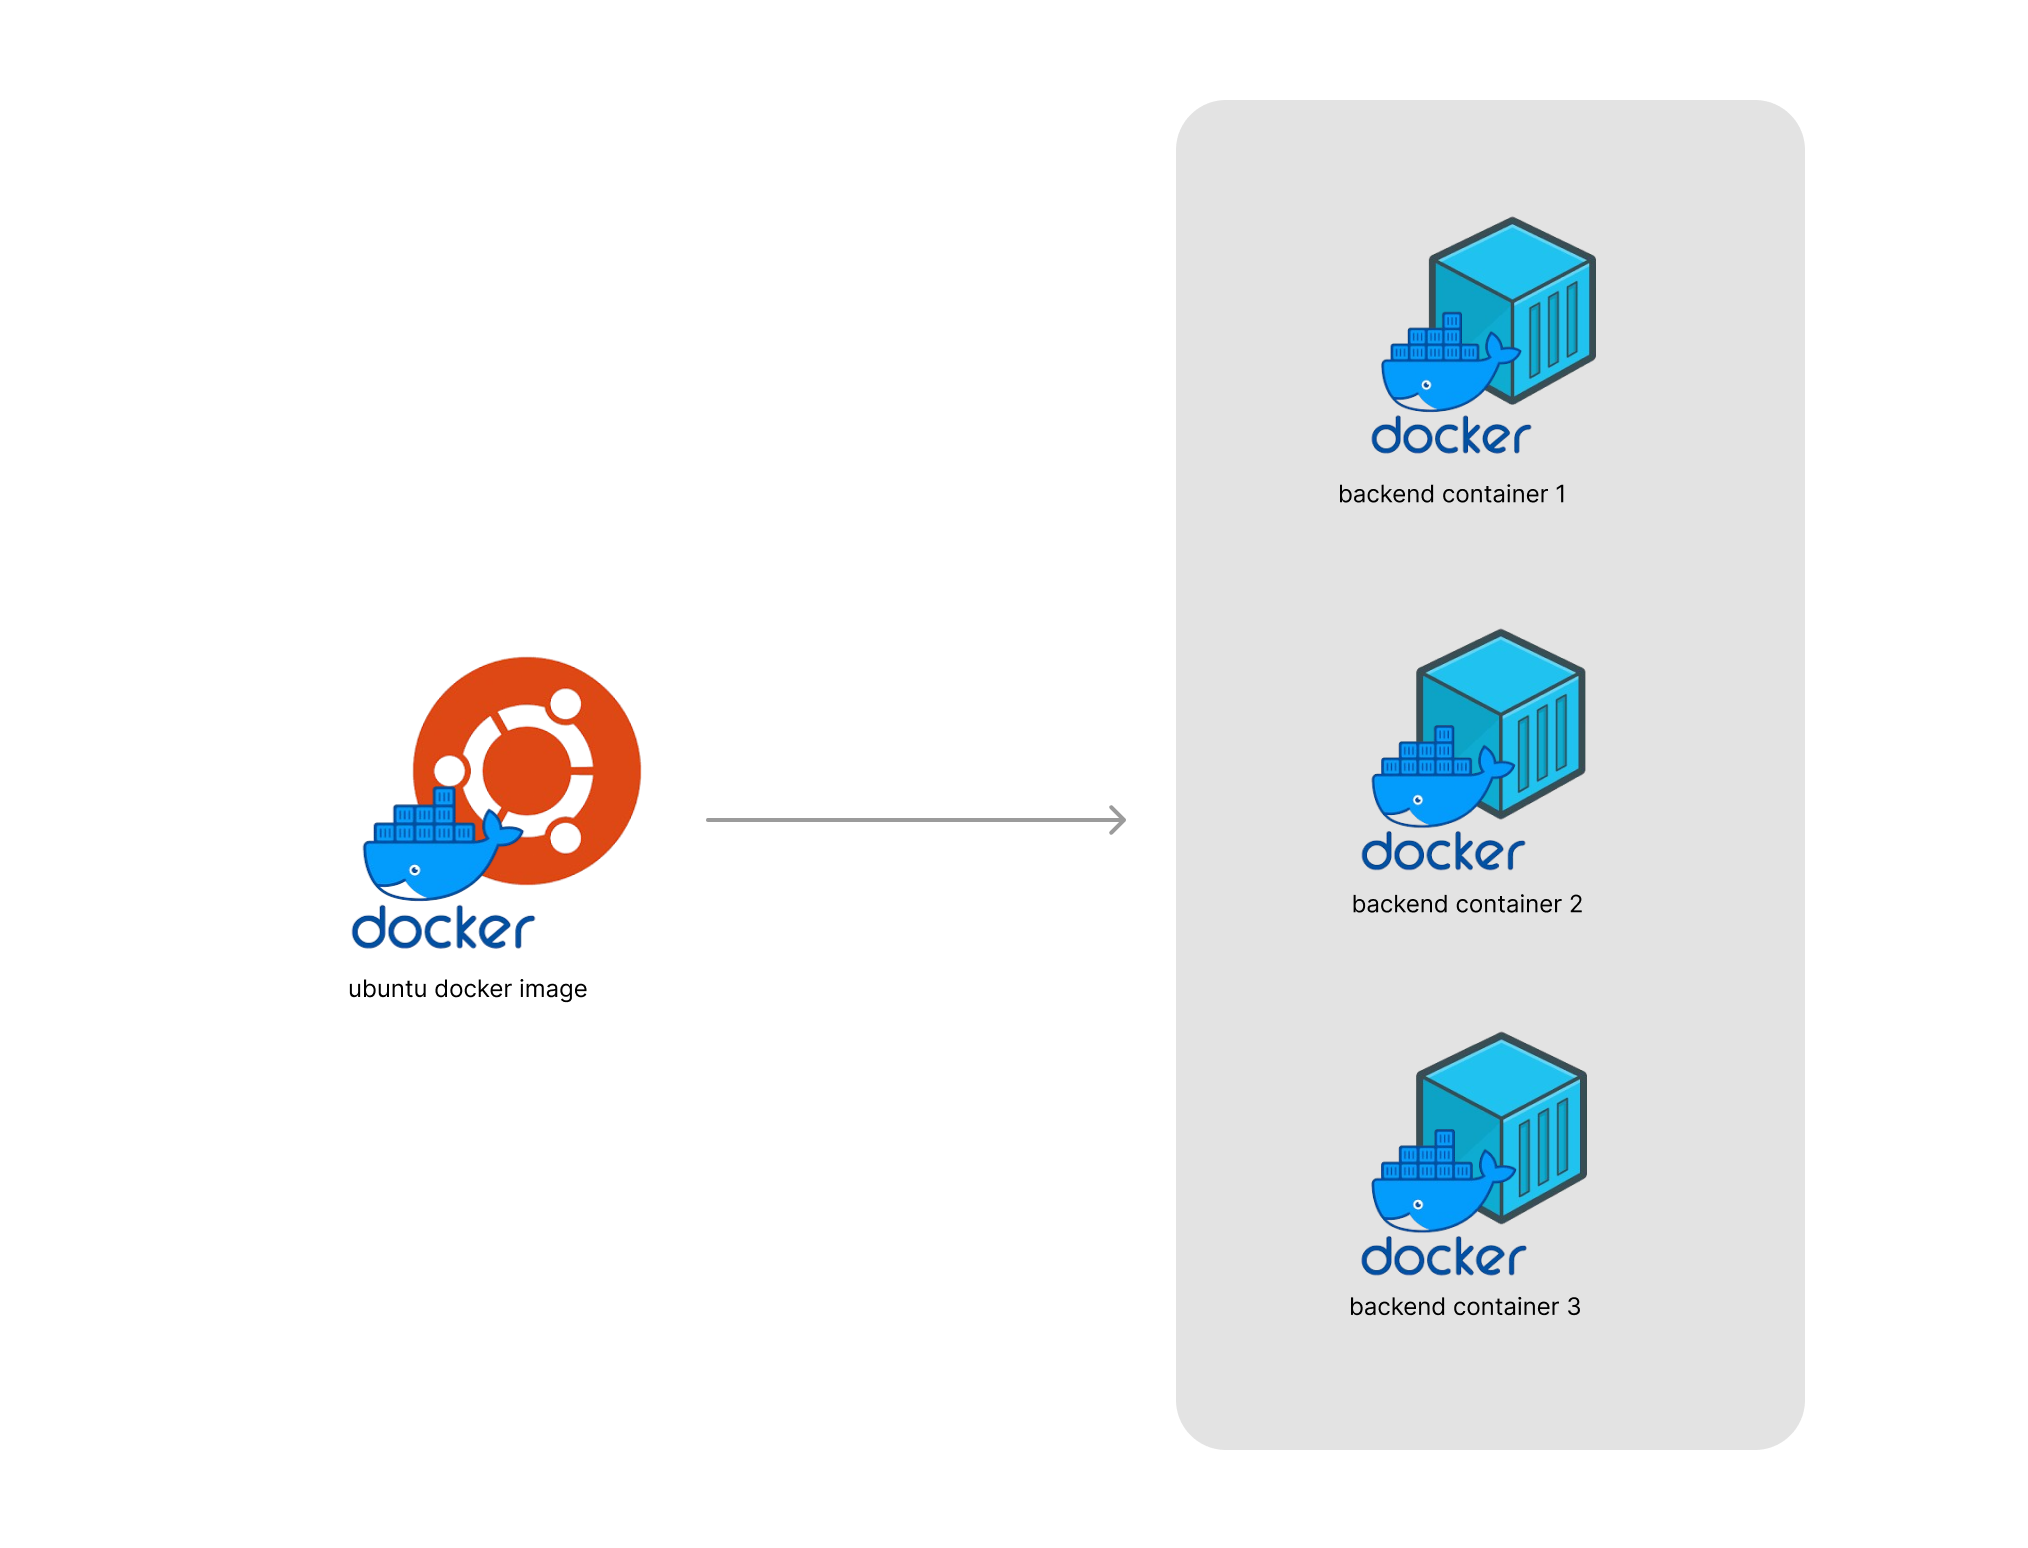
Install docker in ubuntu server
Docker installation guide
Docker file & Docker compose file
Docker file required to named as 'Dockerfile' to set the nodejs backend. Make sure that Dockerfile
is place in the root directory of codebase.
                    # Dockerfile
                    FROM node:22
                    WORKDIR /app
                    COPY package*.json ./
                    RUN npm install
                    COPY . .
                    EXPOSE 4000
                    CMD ["node", "backend/server.js"]
Make sure that tabs for every indentations are only 2 spaces since yml file is really sensitive.
                    services:
                    backend01:
                    image: backend
                    ports:
                    - 4001:4000
                    env_file:
                    - .env
                    command: ["npm", "run", "start"]
                    volumes:
                    - ~/uploads:/app/backend/uploads
                    backend02:
                    image: backend
                    ports:
                    - 4002:4000
                    env_file:
                    - .env
                    command: ["npm", "run", "start"]
                    volumes:
                    - ~/uploads:/app/backend/uploads
                    backend03:
                    image: backend
                    ports:
                    - 4003:4000
                    env_file:
                    - .env
                    command: ["npm", "run", "start"]
                    volumes:
                    - ~/uploads:/app/backend/uploads
Build new image and make sure you are in the root directory of the codebase where
Dockerfile and docker-compose.yml are located.
docker build -t backend .
Build containers using compose file.
docker compose up -d
Docker compose generates multiple containers or instances of the backend denpending on
the number of containers declared in docker compose yml file.
Restart Nginx & Mysql
                    sudo systemctl restart nginx
                    sudo systemctl restart mariadb
 Setup Overview Diagram